Magento 1 To Magento 2 Migration Process – It’s Easy If You Do It Smart
Are you ready for Magento 1 end of life? If so, you must also be prepared for Magento 1 to Magento 2 migration.
Magento already announced that June 2020 will mark the Magento 1 end of life. After that, Magento will officially stop issuing support for Magento 1.x.
They will also not release any updated security features after the July 2020 deadline. This can be a sizeable blow to retailers since this eCommerce platform powers approximately 250,000 websites on the internet.
According to Builtwith,
It also powers around 28 percent websites with over 15 percent using it as the default eCommerce platform. Magento 1.x is getting lost and Magento 2 is being introduced to replace it, you must brace yourself for Magento migration.
Most retailers may, however, find this migration an uphill task because the new version comes with new database design and architecture, etc. There are, however, certain migration features that are simple to apply when you use the tools provided or recommended by the Magento team.
Otherwise, you must follow specific steps when upgrading your site, so you don’t disable/break any critical feature on your store.
When planning on when or how to migrate Magento 1 to Magento 2, here are a few aspects you must keep at the back of your mind, so you don’t ruin any of your store’s functionalities.
- Backup the data. Backup the entire database including folders and files etc. before starting the upgrade process.
- Create a website replica. Create a clone for the store. You’ll be using this to check for any functionality features you could have left out.
- Revise the store. Be sure to keep all the data which are essential before deleting the less important ones.
- Check to confirm. Your current custom codes, themes, and extensions should be compatible with Magento 2.
- Transfer data only. You should also not use your live store when doing this migration. Instead, you should only transfer the store’s data from the database of the cloned Magento 1.x.
To make your migration to Magento 2 simple, we’ve broken the process down into four phases i.e., theme migration, data migration, customization migration, and extension migration. In all these phases, we simplify the complicated features, so you find it interesting swapping the versions.
A How-to-Guide on Magento 1 To Magento 2 Migration
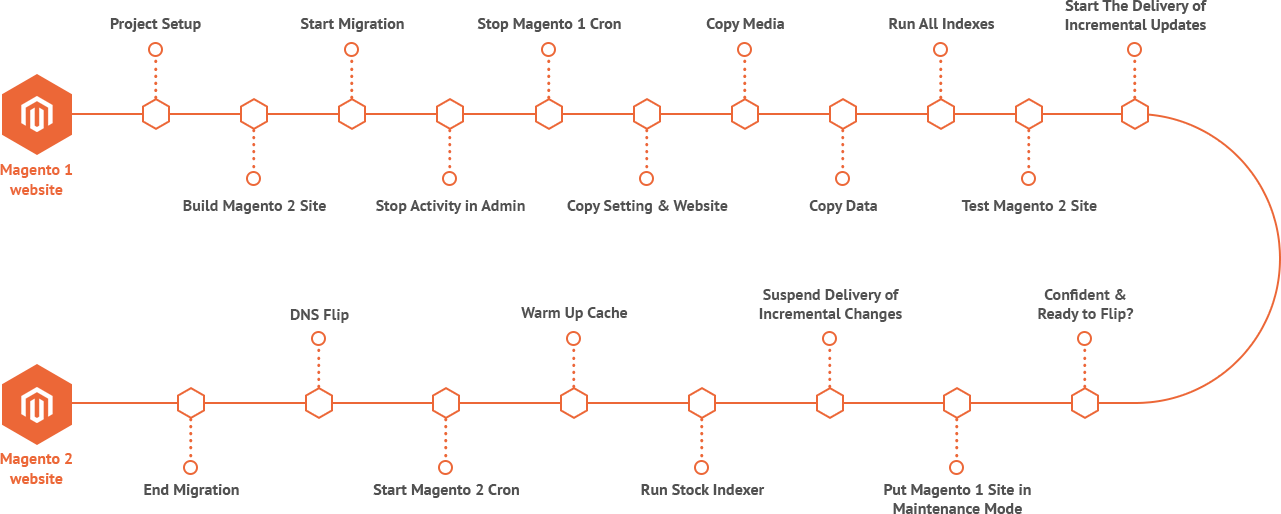
Below step by step instructions will help you to seamlessly migrate your store from Magento 1 to Magento 2.
1) Setup Magento 2 Instance
In setting up your site for the upgrade, you’ll first need to create a clone Magento 2.x store without any sample data. You can download the setup file here: https://www.magentocommerce.com/download. After that, extract the downloaded data then install it.
2) Theme Migration
Check to confirm that the theme you’re using on Magento 1.x is compatible with the themes on Magento 2.x. If the themes are consistent, you can install the original themes in the new Magento 2.x store.
If the themes are not compatible, you can either purchase a new theme from the Magento marketplace or create a new one for your store.
3) Extensions Migration
Just like the theme migration, you’ll first check to confirm that the extensions are compatible with the new version. If not, you’ll need to add new extensions. If compatible, integrate them in version 2 of your store.
4) Customizations Migration
For customization migration, we’re also going to use the Magento code migration tool to make light work of this process. To ensure maximum accuracy, you may need to manually edit a few files from the ones which are automatically generated by the tool. Here’s how to go about this process:
Migrate all the Magento 1.x structures, layout XML files, config XML files and PHP codes which are compatible with Magento 2.x. When migrating the PHP codes, be keen on how the codes work with the Magento framework.
If you’re migrating from arbitrary Magento 1x to Magento 2x, it will be important that you firstly regenerate the mapping files. This is not mandatory, but it has massive influence in the migration process. Here are the migration scripts you’ll run in the store’s root directory via the SSH terminal;
- php bin/migrate.php migrateModuleStructure <src> <dst> – Migrate directory structure
- php bin/migrate.php convertLayout <dst> – Migrate layout
- php bin/migrate.php convertConfig <dst> – Migrate config
- php bin/migrate.php convertPhpCode <dst> <m1> <m2> – Migrate PHP code
Be sure to run all of them.
For further information, visit the GitHub repository of the Magento Code Migration Toolkit.
5) Data Migration
Data migration to Magento 2.x is a bit challenging and techy. Experts advise that you use the Magento 2.x data migration tool to make migrating relevant store data like settings, orders, products, and categories, etc. simple.
Here’s how to go about the data migration process using the tool;
Navigate to the root folder of Magento 2.x clone then open the command line. To download the tool from the cloned store, follow this command:
composer require Magento/data-migration-tool
Before using the tool, check to confirm that it’s compatible with Magento 2.x. For instance, if you’re using Magento V 2.1.1, the tool must also be V 2.1.1.
To check the version of your Magento 2.x store, follow the SSH terminal and navigate to the Magento 2.x root directory then run this command:
php bin/magento -- version
After that, update the data migration tool’s location in the composer.json file found in the root directory of Magento 2.x by running this command:
composer config repositories.magento composer https ://repo.magento.com
composer require magento/data-migration-tool:<version>
From here, navigate to Magento marketplace, click ‘sign in’ then select ‘My Access Keys.’ If you don’t have an access key, click ‘ Create New Access Keys’. Optionally if you had the key, type your public key under the username and the private key in the password section.
When you’re done installing the data migration tool, you should see these directories which come with the configuration and mapping files for the tool:
<Magento 2 root dir>/vendor/magento/data-migration-tool/etc/ce-to-ee
After you’re done with the installation, you’ll find folders which come with the mapping and configuration files for your data migration tool. These folders will include:
- ce-to-ce
- ce-to-ee
- ee-to-ee
Here is a breakdown of the contents in these folders:
- ce-to-ce : Comes with mapping and configuration files to help you in migrating data from Magento 1CE to Magento 2CE.
- ce-to-ee: This folder comes with the mapping and configuration files which will help you in migrating data from Magento 1CE to Magento 2EE.
- ee-to-ee: This folder contains the mapping and configuration files to help you with data migration from Magento 1EE to Magento 2EE.
To avoid any mistake during this process be sure to firstly go to the relevant categories for data then create the config.XML files. Don’t forget to save the files after this.
<source>
<database host=“localhost” name=“Magento1-DB-name” user=“DB-username” password=“DB-password” />
</source>
<destination>
<database host=“localhost” name=”Magento2-DB-name” user=“DB-username” password=“DB-password” />
</destination>
</options>
Location
<source> : has information for Magento 1 ’s database
<destination> : has relevant data for Magento 2
<crypt_key> : encryption key of Magento 1 which can be found in <key> tag for <Magento 1 rootdir>/app/etc/local.xml file.
Migrate Settings Using Data Migration Tool
Using the data migration tool to migrate the settings of your store from Magento 1.x to Magento 2.x, navigate to your Magento 2.x’s root folder from the SSH terminal then execute this command from there;
php bin/magento migrate:settings --reset <path to your config.xml>
Location <path to your config.xml> is vendor/Magento/data-migration-tool/etc/ce-to-ee/<Magento 1.x version>/config.xml
If the setting is successful, you should see a ‘migration success’ message.
Migrate Data Using Data Migration Tool
If you’re willing to migrate orders, wish lists and categories, etc. from your first store to the new one, you’ll need to run this command:
php bin/magento migration:data --reset <path to your config.xml>
Magento 1 to Magento 2 migration process can be a bit challenging, but with this guide, you can do it on your own. Anyway, after you’re done with the entire process, be sure to test run your store to check if all the new functionalities are running smoothly. In case of an error, be sure to check for it via Magento troubleshooting page.
If you’re finding it a bit complicated still, don’t hesitate to drop us a line. We have a team of expert coders and web developers which can help you with this process in the shortest time possible.